How to use MyEd BC to generate parent email lists
While we're huge fans of utilizing Seesaw for parent communication (learn more here), we understand that in some circumstances it may be easier to send out an actual email to a group of parents.
Over the years, many of schools and teachers that we partner with have asked us to help create class email groups through different methods — from well-formatted CSV files (thank you) to hand-scrawled pieces of paper (yep), we've seen it all!

Now that all of our partner schools are using the same Student Information System with MyEd BC, we sought out to see if schools were storing parent information in the same manner, and if MyEd BC could be used to get us that info more easily (and in an easier-to-use manner). Here's what we learned:
- MyEd BC has a lot of menus.
- MyEd BC has some pretty powerful report generating capabilities.
- It's pretty easy to set up a custom report with all of the info we'd need to create your school's parent email groups for the year.
Let's get started!
Creating a custom report containing parent email addresses:
First, a few quick things to note:
- These steps assume that you have a student's Parents/Guardians set up as Emergency Contact 1 and Emergency Contact 2 in MyEd BC.
- An office staff member will need to create this report.
- These steps are specifically for Parent/Guardian email addresses, as this is the only info we're interested in. If you'd like to create another report that contains more parent information (phone number etc.) this could be a good starting point!
- You'll only need to set this report up once. Once it's been configured, you can generate it with just a few clicks!
- Log into MyEd BC and in the top menu, switch to School View.
- Click on the Student tab.
- Head to Reports > Quick Report.
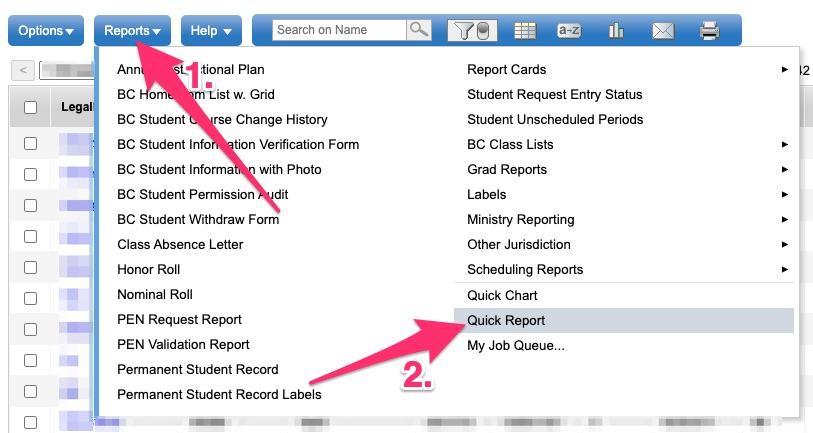
- Choose New Report, and then click Next.
- On the next page, labelled Quick Report: Report Type (Step 2 of 8):
- For Report Type, choose Group.
- Under Group Selection choose Homeroom and then click Add.
- Click Next to move to the next page.

- On the next page, labelled Quick Report: Field Selection (Step 3 of 8), choose all of the default fields under Selected Fields and click Remove.

- Add the following fields and ensure they're listed in the correct order. Note that under Available Fields you can click on the Student dropdown to switch to each emergency contact:
- Name
- Emergency Contact 1 > Name
- Emergency Contact 1 > Primary Email
- Emergency Contact 2 > Name
- Emergency Contact 2 > Primary Email
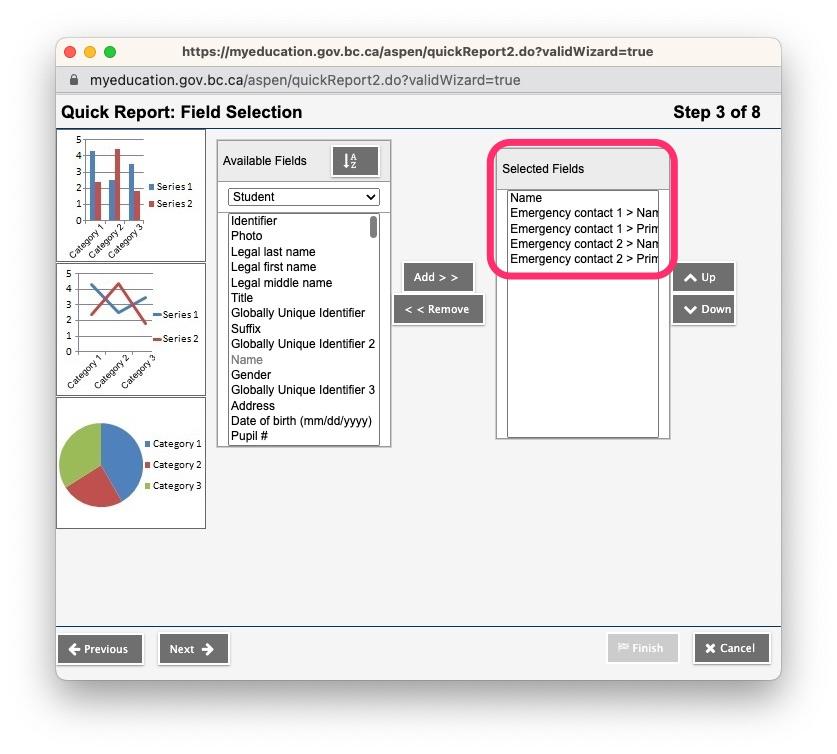
- Once you've added the above fields, click Next.
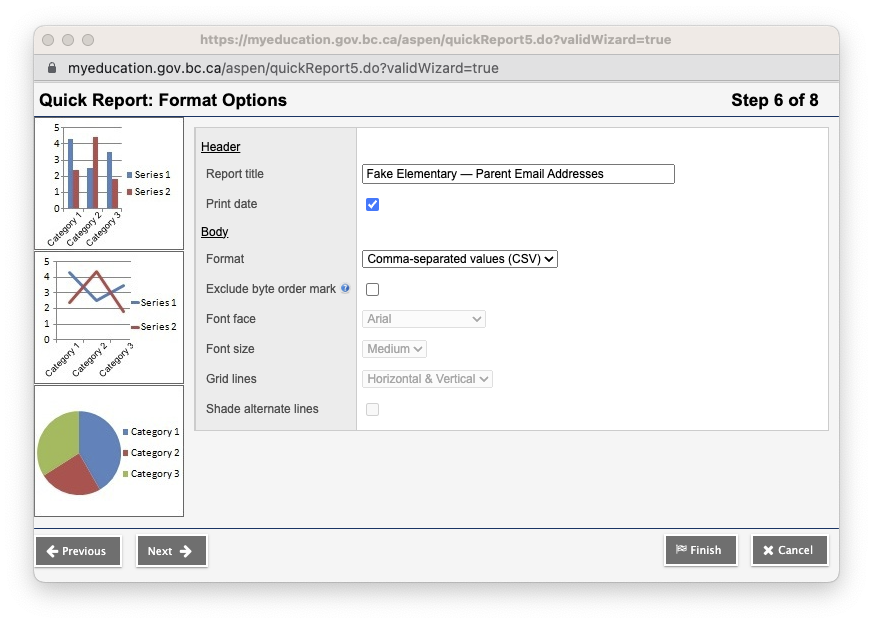
You don't need to change anything on the next two pages (labelled Step 4 of 8 and 5 of 8), so click Next until you hit Step 6. - On the page labelled Quick Report: Format Options (Step 6 of 8):
- For Report Title, name your report something along the lines of [Your School] Parent Email Addresses
- Ensure Print Date is selected
- For Format, choose Comma-separated values (CSV).
- Click Next to move on to the next page.
- The next page labelled Quick Report: Format Field Options (Step 7 of 8) allows you to choose a custom title for each field. We'd suggest the following:
- For the Name field, set the title to Student Name.
- For the Emergency Contact 1 > Name field, set the title to Mom/Dad Name (Mom/Dad being whichever parent your school uses for Emergency Contact 1).
- For the Emergency Contact 1 > Primary Email field, set the title to Mom/Dad Email (Mom/Dad being whichever parent your school uses for Emergency Contact 1).
- For the Emergency Contact 2 > Name field, set the title to Mom/Dad Name (Mom/Dad being whichever parent your school uses for Emergency Contact 2).
- For the Emergency Contact 2 > Primary Email field, set the title to Mom/Dad Email (Mom/Dad being whichever parent your school uses for Emergency Contact 2).
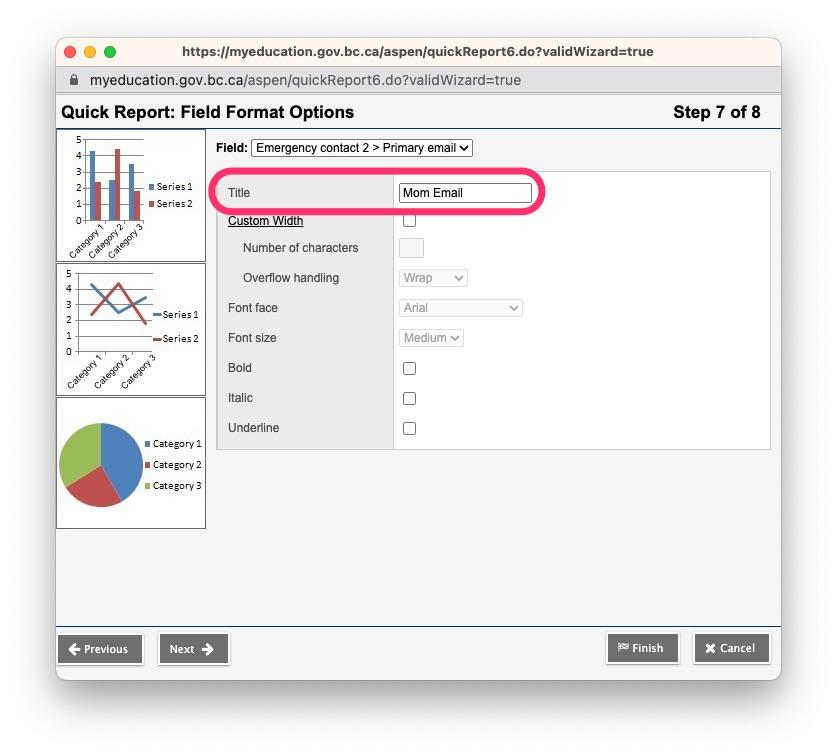
- Click Next to move on to the next page.
- On the page labelled Quick Report: Save Options (Step 8 of 8):
- Since we're creating this report for the first time, choose Save As.
- For the Name, we'd suggest something along the lines of Parent Email Addresses By Class.
- For Owner > Type, User means that only you will be able to generate the report, while School means that other staff members can also generate it.
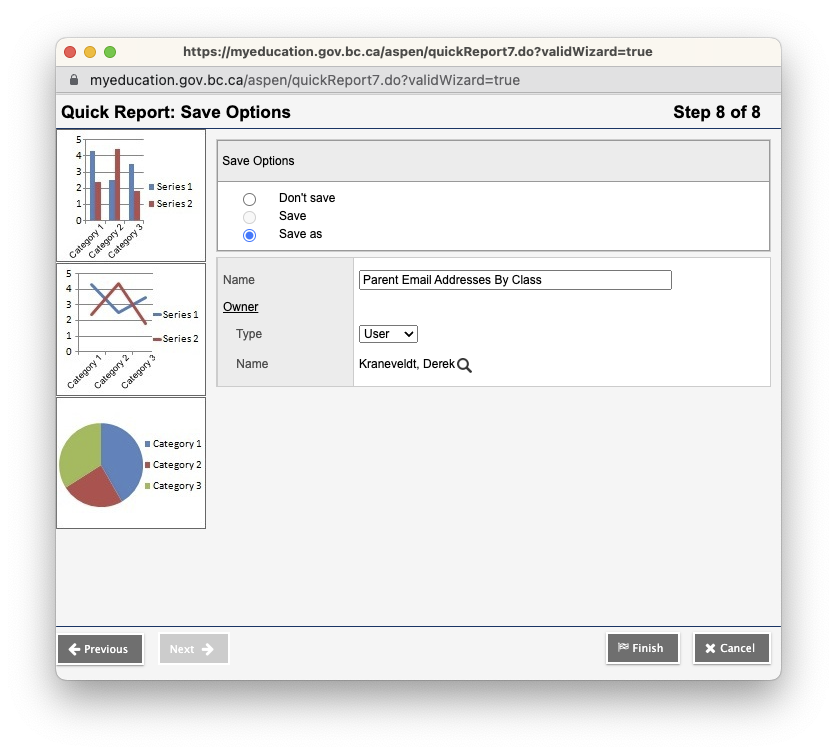
- Click Finish once you've made your selections.


Running your report:
Once the report has been created and saved, it's easy to run at the start of each school year. To run the report, all that you need to do is:
- Log into MyEd BC and in the top menu, switch to School View.
- Click on the Student tab.
- Head to Reports > Quick Report.

- Choose Saved Report and click Next.
- Find the desired report in the list, and click Next.
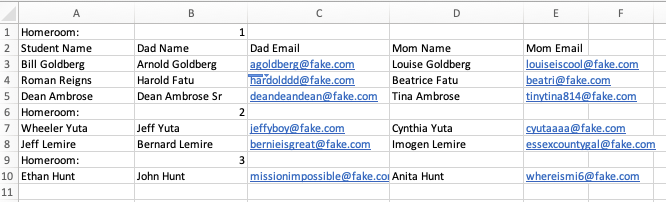
- Click Finish to generate the report. A pop-up will ask where on your computer you'd like to save the file. If you open the file up, you should see something that looks similar to this (but with a lot more lines, and way less obviously fake):
- That's it! If you're looking for our help with creating parent groups for a new school year, submit a request along with the file, and let us know what you're looking for!


Once the groups have been created, you can easily add and remove members as needed throughout the year. We have a short step-by-step detailing the process right here: How to add or remove members from Google Groups.
More Resources:
MyEd BC Help Center (login required): https://myeducation.gov.bc.ca/AspenHelp/640/SI/EN_US/help/Content/Help_Center/Aspen_Main.htm